
My Z was purchased in Jan 94 and
stayed pretty much standard in its original form until in
June 2000 the decision was made to upgrade the car and
realize its full potential. If I had known how different
this car could be, I would have done these upgrades years
ago. The aim was to improve the look and feel of the car
but trying to maintain the original concept.
The Wheels, tyres and suspension were
basically stuffed....the std nissan gear falls well short
of the
 requirements necessary for a
high performance road car, not to mention the short tyre
life. The standard gear was turfed and replaced with
Kings Progressive Lowered
Springs (about 1.5 inch from stock) and
Koni
Adjustable Shocks set to medium in the rear
and medium in the front, along with
Kmac
Camber Kits front and rear. The rear was set to 2
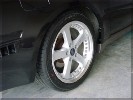
deg neg camber, the front .5 deg neg camber. Next the
search for wheels and tyres which was not easy here in
Australia. After many weeks I decided on a modular wheel
from the Japanese company
Riverside. Rear
17
x 9 Front
17 X 8
. Falken
Tyres replaced the expensive factory Dunlop rubber..
Rear 255 x 40 and fronts
245
X 45 , These mods requirements necessary for a
high performance road car, not to mention the short tyre
life. The standard gear was turfed and replaced with
Kings Progressive Lowered
Springs (about 1.5 inch from stock) and
Koni
Adjustable Shocks set to medium in the rear
and medium in the front, along with
Kmac
Camber Kits front and rear. The rear was set to 2
deg neg camber, the front .5 deg neg camber. Next the
search for wheels and tyres which was not easy here in
Australia. After many weeks I decided on a modular wheel
from the Japanese company
Riverside. Rear
17
x 9 Front
17 X 8
. Falken
Tyres replaced the expensive factory Dunlop rubber..
Rear 255 x 40 and fronts
245
X 45 , These mods
 made an incredible difference to
handling and steering of the car...gone was the
characteristic rear sag on acceleration and the steering
is now much flatter with far better turn in, and the ride
is definitely more harsh on the real rough stuff, but
overall its great...Many thanks go to
Donnellans
the Tyremen who did a fantastic professional job...something
I found very hard to find...check their website at http://www.donnellans.com.au/ made an incredible difference to
handling and steering of the car...gone was the
characteristic rear sag on acceleration and the steering
is now much flatter with far better turn in, and the ride
is definitely more harsh on the real rough stuff, but
overall its great...Many thanks go to
Donnellans
the Tyremen who did a fantastic professional job...something
I found very hard to find...check their website at http://www.donnellans.com.au/
With the Handling sorted out next came
some extra horsepower, the std turbo engine is good for
around 155 KW (200 hp) and
this is a fraction of what this fine engine is capable of.
The Jap engineers seem to have designed the engine for
much greater horsepower but decided to set the std boost
to around 5-6 psi. I went
 about
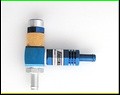
increasing the boost with a
Turbosmart Gated
Boost Controller. This device is incredibly
simple to install and adjust and has to be the best $100
you could spend to increase horsepower. The boost was set
at 12 psi and Shell Optimax Premium unleaded go
juice combined to give smooth results without fear of
detonation. The greater boost required a better in and
out feed of the gases, the stock airbox was removed and
replaced with an
Simota high flow
air filter element and a
150mm length of 75mm exhaust pipe (painted black). Not
too much cool air is available for intake so the metal
and rubber strip between the nose and radiator was
removed which allowed copious quantities of outside air
to enter the airbox. The rest of the air box was sealed
off from the engine compartment (using the discarded
rubber strip) finishing off a cheap, but very efficient
intake. The
removal of the resonator box gave the car a slight
burbling sound on about
increasing the boost with a
Turbosmart Gated
Boost Controller. This device is incredibly
simple to install and adjust and has to be the best $100
you could spend to increase horsepower. The boost was set
at 12 psi and Shell Optimax Premium unleaded go
juice combined to give smooth results without fear of
detonation. The greater boost required a better in and
out feed of the gases, the stock airbox was removed and
replaced with an
Simota high flow
air filter element and a
150mm length of 75mm exhaust pipe (painted black). Not
too much cool air is available for intake so the metal
and rubber strip between the nose and radiator was
removed which allowed copious quantities of outside air
to enter the airbox. The rest of the air box was sealed
off from the engine compartment (using the discarded
rubber strip) finishing off a cheap, but very efficient
intake. The
removal of the resonator box gave the car a slight
burbling sound on deceleration, but its not too loud and
along with the louder breathing on gear change sounds
pretty good. deceleration, but its not too loud and
along with the louder breathing on gear change sounds
pretty good.
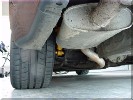 The original
exhaust was too restrictive and now is straight thru but
retaining the original diameter, the std muffler was
booted in favour of a straight thru sports version with
sexy chrome tip fitted. These intake and
exhaust mods in my opinion are all thats required with
the boost set to 12-14psi, more boost would probably benefit
from a 75mm mandrel bent system, but remember that
without an intercooler you will be wasting your time.
Estimated output is around
230 KW which is a fairly significant
difference
from stock. The original
exhaust was too restrictive and now is straight thru but
retaining the original diameter, the std muffler was
booted in favour of a straight thru sports version with
sexy chrome tip fitted. These intake and
exhaust mods in my opinion are all thats required with
the boost set to 12-14psi, more boost would probably benefit
from a 75mm mandrel bent system, but remember that
without an intercooler you will be wasting your time.
Estimated output is around
230 KW which is a fairly significant
difference
from stock.
The exterior was starting to get a
little tired, so I began restoring what I could before
the professionals at the paint shop had their chance. The
windscreen surrounds and wiper blade holders
 were rejuvenated with were rejuvenated with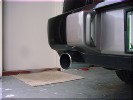 etch primer and a couple of coats of gloss black. Next
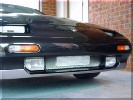
the centre piece of the std grille was removed and finished off. The
Pro's then set about repainting the front end along with all the "grey"
areas around the car, the colour chosen is HSV commodore full gloss grey
which I think is much better than the std grey. A piece of chrome plated
expanded aluminum mesh was installed in the grille area, which gives
better protection and a slimline number plate completes the custom look. etch primer and a couple of coats of gloss black. Next
the centre piece of the std grille was removed and finished off. The
Pro's then set about repainting the front end along with all the "grey"
areas around the car, the colour chosen is HSV commodore full gloss grey
which I think is much better than the std grey. A piece of chrome plated
expanded aluminum mesh was installed in the grille area, which gives
better protection and a slimline number plate completes the custom look.
Next the
brakes came in for a dress up, giving the calipers a coat of heat
resistant red. The hardest part was masking up which took about 30mins
per wheel, making
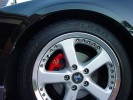 sure
only the calipers got the paint, a couple of gold "z'" with adhesive
backing from the hardware finished the job. sure
only the calipers got the paint, a couple of gold "z'" with adhesive
backing from the hardware finished the job.
A set of
aluminum brake pedals and some blue neon cold cathodes was installed and
a matching gear knob will be installed once a match is found. The
windows then received 20% film which sort of gives off a green tinge
when mixed with the factory tint.
The rest of the car was brought up to
standard which included replacing elec window motors, rear windscreen
wiper/washer etc so that now everything is working just as it was before
leaving the showroom.
Geoff
|